
Understanding and Setting the Tiller
What tiller is and why bows have it
You grip a recurve bow at the middle of the riser. Your drawing hand, however, is not in line with your bow hand but sits above or below it, depending on how you take the string. The force therefore does not act symmetrically on the two limbs but is shared unevenly between them.
Which of the two limbs takes the greater share cannot be stated in general terms. It depends on how you hook the string and on where your bow hand pushes against the riser. That pressure point is set by the shape of the grip and by the way you hold your hand, and it does not sit in the same place for everyone. The higher it sits, the shorter the distance to the upper limb and the longer the distance to the lower one, so the load splits differently. That is precisely why tiller is an individual setting rather than a constant.

What tiller has to achieve is clear enough. Both limb tips should come forward in step as the arrow leaves the string. If they do not, they release different amounts of energy and the arrow picks up an impulse it can do without.
A compound bow has no tiller in this sense. The question only comes up on a recurve or a longbow.

Which bows can be adjusted at all
This is where the field divides, and for a good many readers the article ends here with a reassuring answer.
- One piece bows: nothing to adjust. The tiller is built into the shape.
- Limbs bolted solid: nothing to adjust either. The manufacturer fixed the tiller during production.
- Tiller bolts, ILF or Formula fitting: here the angle of the limbs can be altered, and only here does the rest of this apply.
The abbreviation ILF stands for International Limb Fitting. It refers to a limb fitting that several manufacturers build to the same dimensions. The practical upshot is that you can pair limbs and risers from different brands.
If your first bow falls into the second group, that is no disadvantage. It leaves the factory tillered for a common grip and shoots happily with either of the usual techniques. Adjust the nocking point if you need to, and that is that. Which models use an ILF fitting is easy enough to see in the bows category.
Measuring the tiller
Always measure with the bow strung. On an unstrung bow the figure means nothing, because the limbs are not under load.
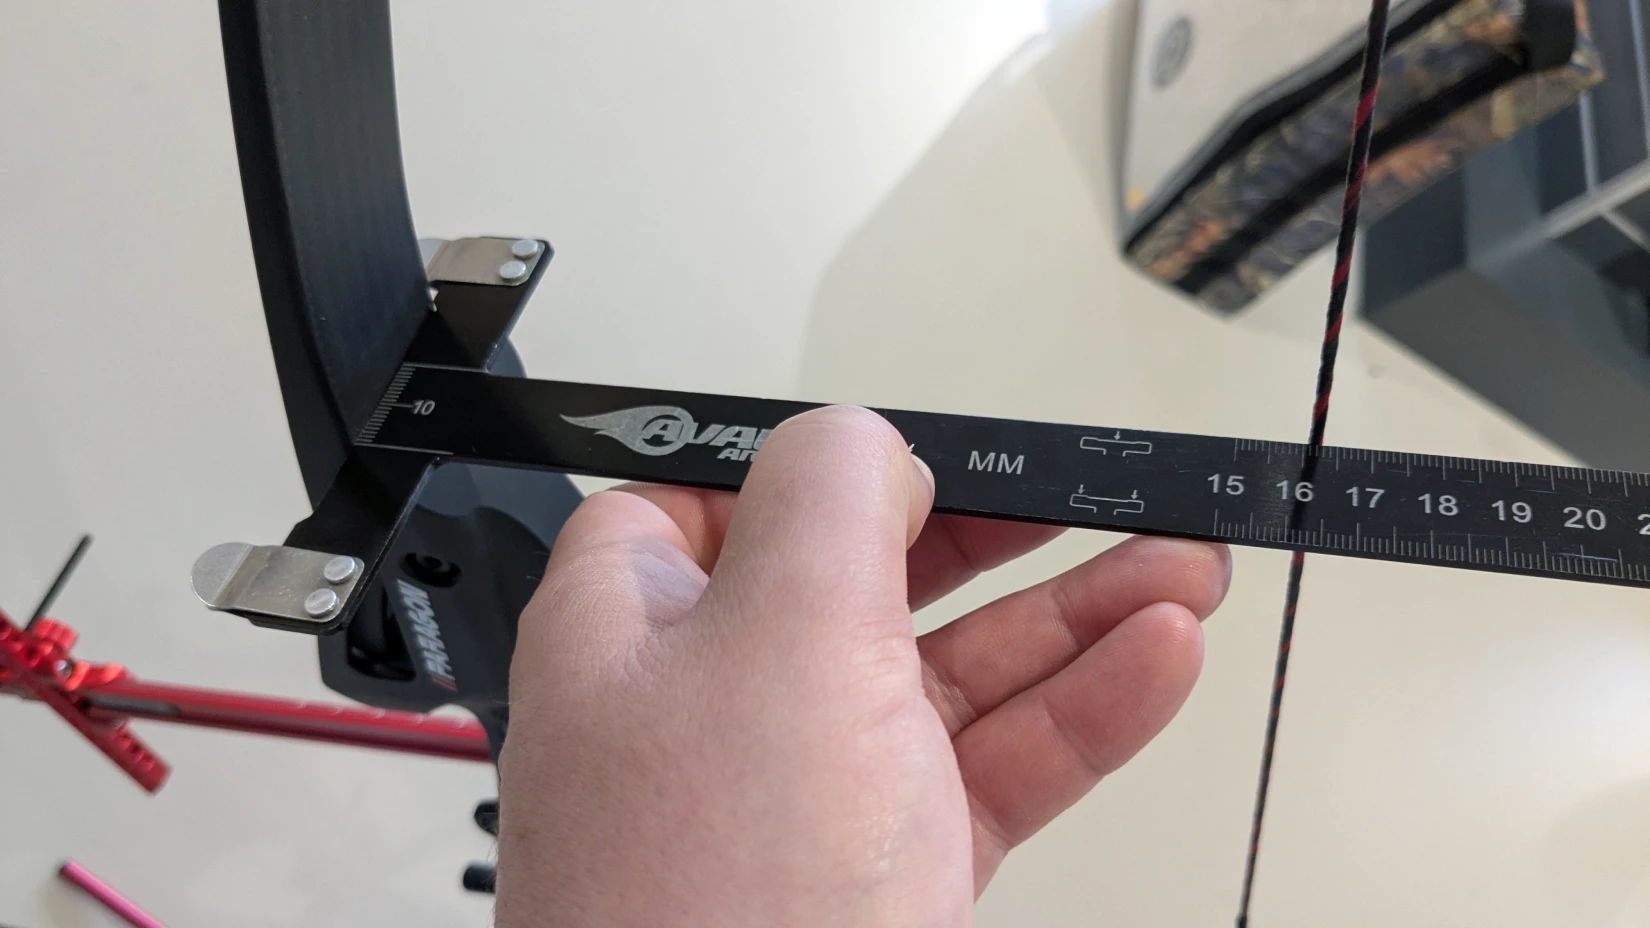
You need a measure with a fine scale. A bow square, the same one you already use for brace height and nocking point, does the job. For the adjustment itself add a set of Allen keys in imperial sizes.
- Set the measure where the riser ends and the limb comes out of it, at the top.
- Measure across to the string and note the figure.
- Do the same at the lower limb.
- Subtract the lower figure from the upper one.
An example. You read 20.2 cm at the top and 20.0 cm at the bottom. The difference is 2 mm, which is a positive tiller of 2 mm. If the result comes out negative, the lower distance is the larger one and the bow has negative tiller. If both readings match, the bow runs zero tiller.
Keep the measure square while you do it. Even a slight tilt throws the reading off by more than the whole adjustment range amounts to.
What figure is right for you
There is no single correct tiller. What settles it is how you hook the string, because that determines where the force is applied.
| Technique | Hook on the string | Tendency for the tiller * |
|---|---|---|
| Mediterranean | one finger above the arrow, two below | 3 to 6 mm positive, the usual range |
| Three under the arrow | lower than mediterranean | 0 to 2 mm, down to zero tiller |
| String walking in barebow | considerably lower, varying with distance | negative tiller can make sense |
* All the figures given here are guide values. What governs is the data sheet or the manufacturer specification for your bow.
The rule behind it is simple. The lower you hook the string, the less positive tiller you need. That range of 3 to 6 mm applies to the mediterranean grip and holds for sport recurves just as it does for traditional recurves and longbows.
Two qualifications belong with it. Manufacturers publish their own recommendations for their risers, and those usually assume their own riser paired with their own limbs, so they do not necessarily carry over to a mixed setup. Beyond that, modern and very stiff risers get by on much smaller figures, down to zero tiller, where no difference between top and bottom can be measured any more. A value that was normal on an older bow can be too much on a new one.
What you cannot derive from any of this is another archer's tiller. Never copy a setting simply because it works for someone at your club.
Changing the tiller
Before you touch a tiller bolt, everything else has to be right. The order is not arbitrary.
- Align the bow. The string should run centrally through riser and limbs.
- Set the brace height to the manufacturer figure for your bow.
- Fit the nocking point.
- Only then the tiller.
Back a tiller bolt out and the limb it holds is pre-tensioned less, so its distance to the string grows. Turn it in and the reverse happens. Anyone chasing negative tiller for barebow therefore backs the lower bolt out a little.
Loosen the locking screw first
Every tiller bolt has a locking screw that holds its position. Where that screw sits depends on the riser. On sporting risers you usually find it at the back of the riser, on wooden risers it often sits inside the tiller bolt itself. Both screws take an Allen key, as a rule in two different sizes.
That fixes the order:
- Ease the locking screw off.
- Bring the tiller bolt to the figure you want.
- Tighten the locking screw again.
The first and the last step are the ones most often skipped, and both come back to bite. With the locking screw still tight you are simply turning against it. And without tightening it again, the setting works its way back as you shoot, so the figure you measured no longer holds after a few sessions.
Two limits you must not cross
There is a point when backing a bolt out where the limb no longer seats safely. Two conditions cap this, and whichever you reach first is the one that counts.
- At least three full turns have to remain engaged in the thread.
- Contact with the limb must not be lost at any point.
So how do you know how many turns you have to begin with? If the manual for your bow states the adjustment range, that figure governs. Where it does not, there is a simple way to find out, and it only works on an unstrung bow. Run the tiller bolt in the riser all the way in, then back it out again, counting the turns as you go. That gives you the full travel of the bolt, which tells you how much room is left before the three turn limit.
Note where the bolt sat before you start, or you will be hunting for that position afterwards. Tiller, draw weight and brace height all need setting again after this check anyway.
If you are unsure whether either condition still holds, turn the bolt back in and have the bow looked at by a dealer. A limb coming out of its fitting under load is not a theoretical risk.
What moves along with it
Changing the tiller does not only change the tiller. Two figures shift with it, and both want checking afterwards.
- Draw weight: the tiller bolts give you roughly 2 to 3 lbs of adjustment, so anyone moving the tiller moves their draw weight along with it.
- Brace height: this shifts too and has to be measured again.
How much tiller difference a single turn produces cannot be stated generally. It comes down to the thread and to the manufacturer. Work in small steps and measure after each one rather than looking for a rule of thumb that does not exist.
What full draw tells you and what it does not
A common piece of advice is to stand in front of a plumb line, draw the bow and check whether the riser sits upright. As a test of tiller that does not work, and the reason is worth understanding.
The moment the bow is in your hand, the two of you form a closed force system. If one limb is stronger than the other, the riser does not simply tip away. Your bow hand balances the torque without you noticing, or your drawing hand shifts a little up or down. What you see is the sum of bow and archer, not the bow on its own.
Tipping forward or back also depends far more on other things. On weight distribution, meaning how front heavy your setup is, and on the pressure point of your bow hand. The limbs come a long way down that list.
Limb bend can only be judged reliably with the bow held fast at the pivot point of the grip and the string drawn exactly at the nocking point. That is what a tillering board is for. Only that fixing decouples the bow from the hand, and only then does a vertical reference help at all. It is workshop work and belongs more to bow building than to a sport bow you are setting up.
For you that means the measured figure at the riser stays the basis, not what you see at full draw.
What full draw does give you is a feel. If the tiller does not suit your hook, the bow becomes harder to hold steady. That is not a measurement, but it is the reason to go and measure.
Tiller and your rulebook belong together
Past a certain level you no longer set the tiller to the bow but to the discipline you shoot. The reason is string walking, where the hook on the string moves with every change of distance.
Shoot nothing but indoors at 18 metres and you set the tiller so that it feels right at exactly that distance. Move around a 3D course with changing distances instead, and you optimise for your average distance so that short and long targets both stay workable.
How plainly that shows up is worth an example from our own season. One of our archers turned up to the indoor league with a bow tillered for 3D distances, shooting between 6 and 18 metres. On the short distances the hook sat so low that the bow was noticeably harder to hold steady at full draw. Shootable, but never comfortable.
So if you are thinking about optimising your tiller, settle first which rulebook you are optimising for. Without that decision you end up tuned to an average distance you never actually shoot.
Why tiller wants checking regularly
A tiller you set once does not stay where you put it. Weather, wear and above all the vibration of each shot shift the figures over time.
That is why tiller belongs in your shooting log alongside brace height. Only an archer who has written the target figure down will spot a deviation, and only then can a coach make considered corrections across a season.
While you are at it, check every bolt on the bow for a tight seat. After a dry fire that is not optional, because in that case the whole of the energy stays in the equipment instead of going into an arrow.
If your arrows suddenly fly differently from usual, do not look to your technique first. The cause often sits in the equipment, and tiller is among the figures worth measuring again early on.
Where the basics do not fit, though, no amount of fine tuning will rescue them. Which bow length goes with your draw is covered in the article on bow length. That one is about choosing the bow, this one about tuning the bow you already own.
A few closing thoughts
Tiller is fine tuning, not a rite of passage for beginners. If your bow shoots cleanly and sits quietly at full draw, there is no reason to touch anything. Measure it once properly, write the figure in your shooting log, and measure again a few weeks later. That alone tells you more about your bow than most archers know, without a single bolt being turned.
FAQs
What is tiller on a bow?
Tiller is the difference between the distance from the upper limb to the string and the distance from the lower limb to the string. You measure it on a strung bow, at the point where the riser ends and each limb begins. It compensates for the two limbs being loaded unevenly at full draw.
How do I measure tiller?
String the bow and measure with a bow square from the junction of riser and limb across to the string, once at the top and once at the bottom. Then subtract the lower figure from the upper one. Readings of 20.2 cm at the top and 20.0 cm at the bottom give a positive tiller of 2 mm.
What tiller figure is correct?
For the mediterranean grip the usual range is 3 to 6 mm of positive tiller, on sport recurves as much as on traditional recurves and longbows. The lower you hook the string, the less you need. For string walking a negative tiller can make sense.
Can tiller be adjusted on every recurve bow?
No. Only bows with tiller bolts can be adjusted, meaning ILF and Formula fittings. On one piece bows and on bows with limbs bolted solid, the manufacturer fixes the tiller during production and you cannot change it.
Does changing the tiller change my draw weight?
Yes. The tiller bolts give you roughly 2 to 3 lbs of adjustment, so draw weight moves along with the tiller. Brace height shifts as well, and both want checking again after any change.
How often should I check the tiller?
Regularly, because weather, wear and the vibration of each shot move the figures over time. Note the target figure in your shooting log so that a deviation stands out. After a dry fire, check every bolt on the bow for a tight seat as well.
What happens if the tiller is out?
The two limbs then work out of step and release different amounts of energy. The arrow picks up an unsettled departure, and the bow is harder to hold steady at full draw. Because tiller drifts on its own over time, compare your measurement with the entry in your shooting log before you look for the cause in your technique.