
Assembling a Recurve Bow the Right Way
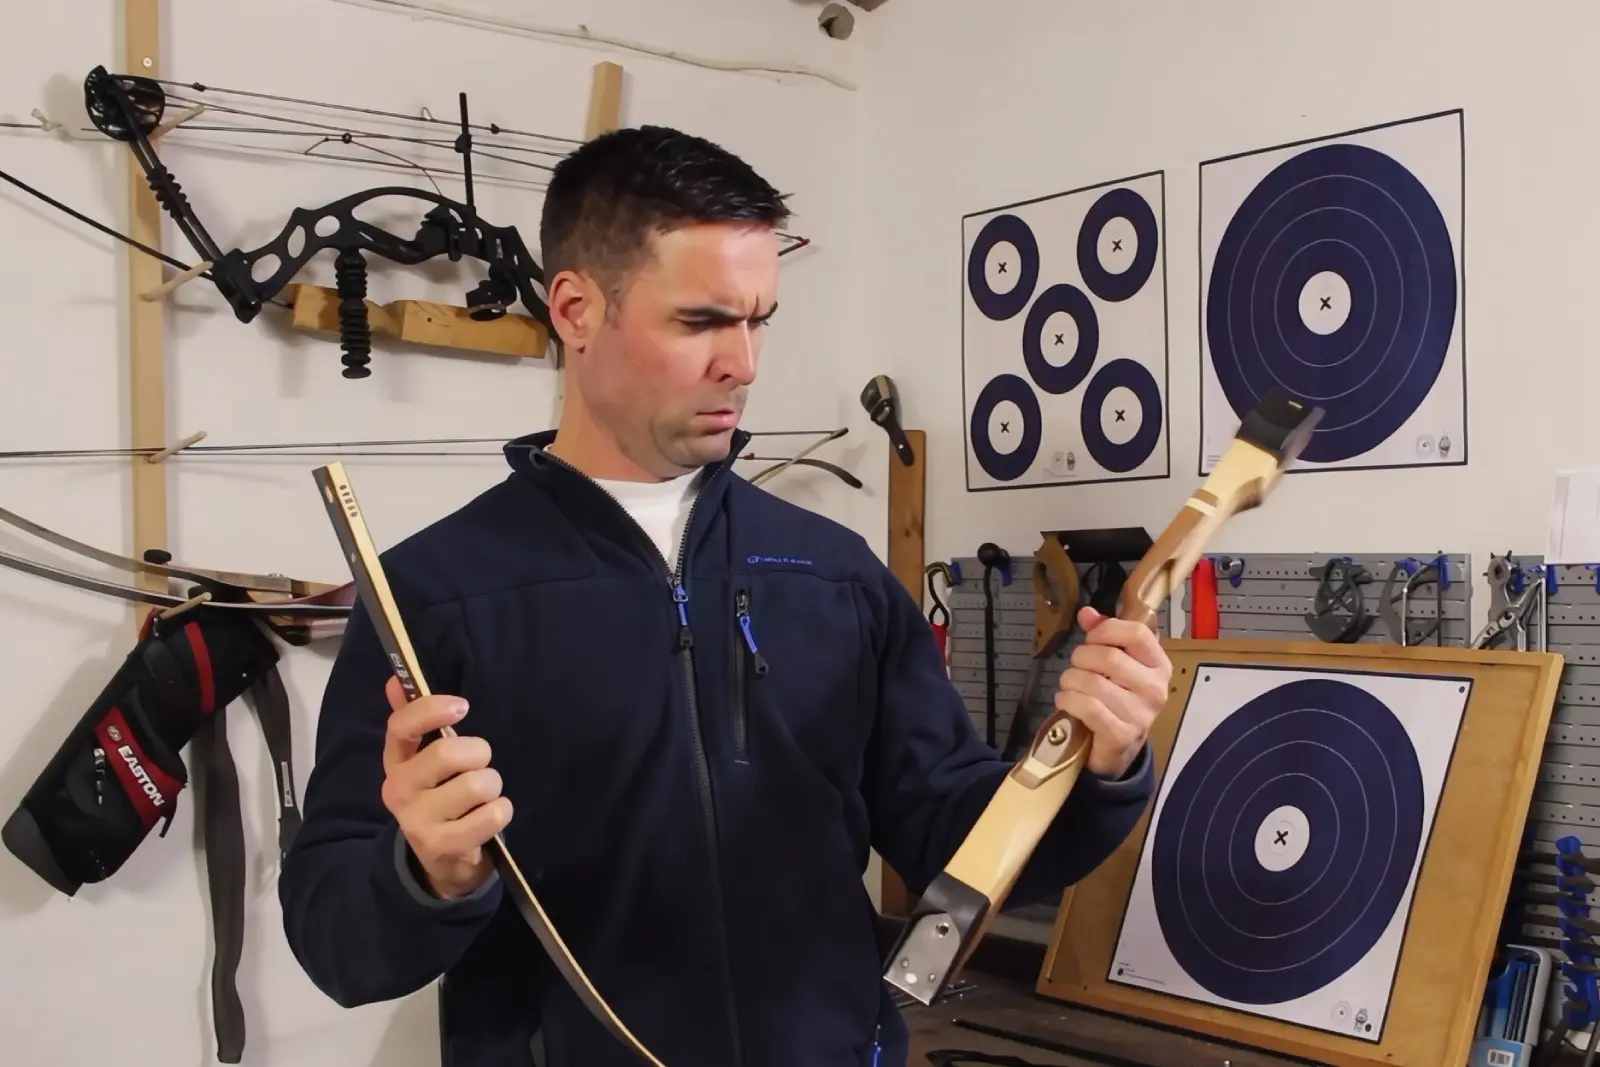
What you need for the job
An entry level recurve arrives in pieces. That is what take-down means, a bow you can break down again. On more affordable models the limbs are bolted to the riser, on pricier ones they sit in an ILF fitting and hook in. This guide covers the bolted version, because that is the usual way in.
Here is what comes in the box:
- Riser: the handle section. It carries both limb pockets and the threaded holes for arrow rest and sight.
- Two limbs: the flexing parts that store the energy as you draw. One goes up top, one at the bottom.
- Bowstring: matched to the length of your bow. Its two loops are usually different sizes.
- Limb bolts: the screws that hold the limbs to the riser.
- Arrow rest: the small part your arrow sits on until you loose. It either glues or screws on.
Then there are tools that do not always ship with a set and that we would still call essential. A bow stringer for putting the string on, a bow square for measuring, nocking pliers with a set of nock points, and a little serving thread. A sight is optional and you will not miss it for your first arrows.
Which bow length actually suits your draw is a question the article on bow length answers. That one is about choosing before you buy, this one is about assembling the bow already sitting in front of you.

Bolting the limbs to the riser
Pick up the riser and look at the two limb pockets, the recesses at either end that the limb drops into. Each limb has a locating feature that only fits one way. If you find yourself twisting a limb to make it go in, you are holding it the wrong way round.
Which limb goes on top?
Most entry level bows carry a marking on one of the two limbs, usually the draw weight in lbs. If it explicitly says upper or lower, follow that. Where no such marking exists, the two limbs are identical on many models, and the marked limb conventionally goes at the bottom. That keeps the figure readable without putting it in your line of sight.
Seat the limb in the pocket and run the bolt in. Tight here means no play, so nothing rattles or works loose as you shoot. It does not mean leaning on the tool. Then repeat at the other end.
Finish by checking both limbs by hand. Neither should move sideways in its pocket. If you later want to move up in draw weight, a set of replacement recurve limbs is the part you change, and the riser stays.
Putting the string on with a stringer
This is the step where most goes wrong, and also the one you will handle safely with a little preparation.
Preparing the string
A new string gets a few twists before it goes on. That keeps the individual strands together and gives you a way to fine tune brace height later. More twists shorten the string and raise the brace height, fewer twists lower it.
While you are at it, look at the center serving, the reinforced section in the middle of the string. It wants to sit where your fingers naturally land at full draw.
Large loop up top
The two loops on a bowstring are usually different sizes. The larger one belongs on the upper limb, the smaller one on the lower limb. The reason is practical. The large loop has to slide along the limb as you string the bow, while the small one sits fixed in its groove from the start.
Stringing
- Hook the small loop into the groove of the lower limb.
- Slide the large loop onto the upper limb without seating it yet.
- Lay the stringer over both limb tips and stand on it with both feet.
- Pull the riser up evenly. The limbs flex and the string goes slack.
- Slide the large loop into the upper groove with your free hand.
- Let the bow down slowly and take the stringer off.
Now check that both loops sit cleanly and centrally in the grooves at the limb tips. A loop that only half seats will jump off on your first draw.
Right or wrong, reading the silhouette
Here is the mistake we see more than any other. The bow is together, the string is on, and something is still off. Viewed from the side it takes a second to settle.
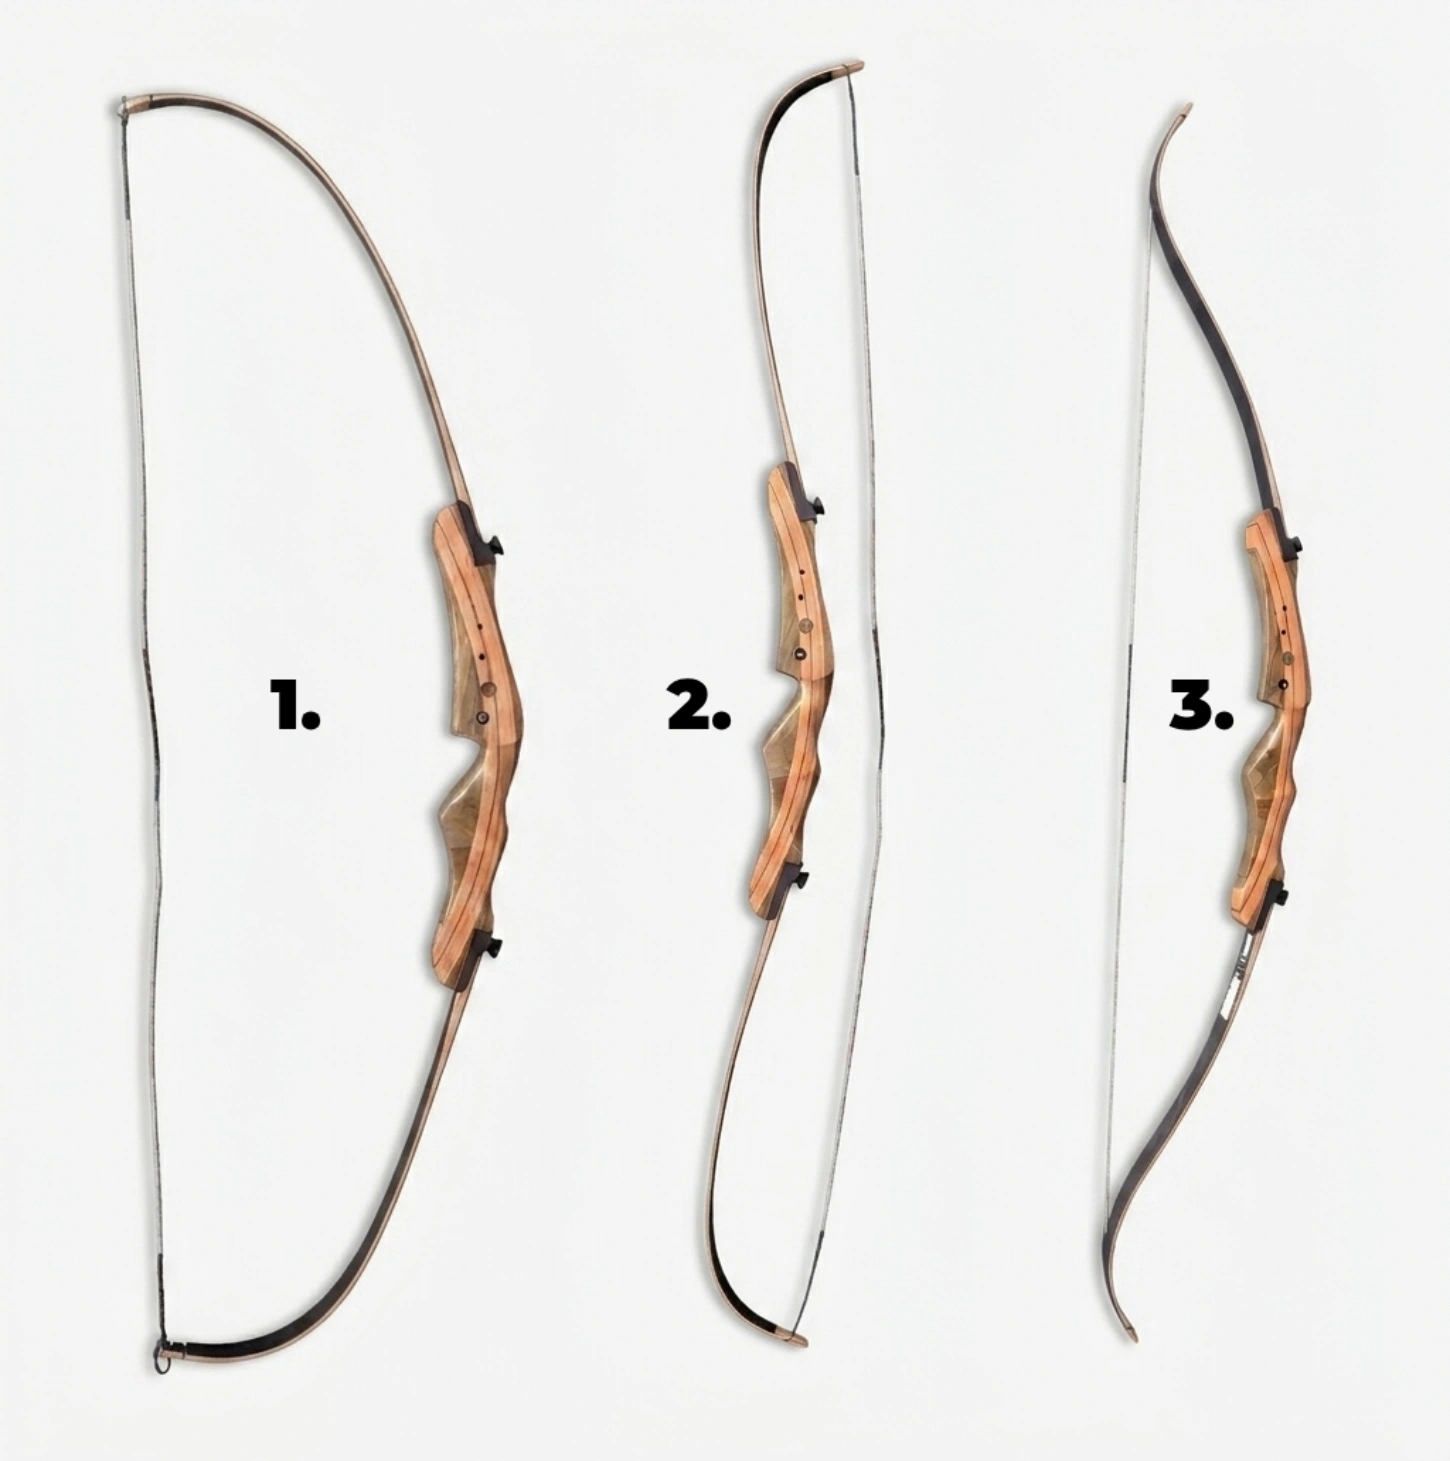
| Setup | Limbs | String | How you can tell |
|---|---|---|---|
| Image 1, incorrect | mounted the wrong way | strung incorrectly | The limbs are mounted the wrong way and point back towards the archer. The string cannot build up any tension and appears far too long. |
| Image 2, incorrect | mounted correctly | on the wrong side | The limbs are mounted correctly, so their tips point downrange. The string, however, has been strung the wrong way, which means it does not run across the back of the limbs and the required tension cannot build up. |
| Image 3, correct | mounted correctly | strung correctly | Both the limbs and the string are mounted correctly. The limb tips point downrange and the string runs across the back of the limbs to build up the tension you need. |
The rule of thumb is short. The string runs on the side facing you as you shoot, and the bow curves away from you. Near both limb tips the string lays itself against the limb for a stretch. That contact is what makes a recurve a recurve, and it is exactly what goes missing when something sits back to front.
A bow in state 1 or 2 does not get shot. The limbs are loaded in a direction they were never built for. Take the string off with the stringer and start again.
Why the step-through method is out
You will find the step-through method online, where you put one leg through the bow, bend it across your thigh and hook the string on that way. Plenty of beginners search for exactly that shortcut. We would advise against it, for two reasons.
Stepping through does not bend the bow in one plane, it twists it. The limbs take a sideways load they were not designed for, and on the slim limbs of an entry level bow that is enough to warp them for good. The second reason concerns you. If the bow slips in that position, a limb tip whips up unchecked and the string catches your forearm. String slap of that kind hurts a good deal more than it sounds.
A bow stringer costs little and bends both limbs evenly in the right plane. Many sets include one. If yours does not, you will find them among the accessories for our recurve bows.
Checking the brace height
Brace height is the distance between the deepest point of the grip and the string, measured with the bow strung. It has a say in how quietly and how steadily the bow behaves in the shot. You measure it with a bow square, hooked onto the string and brought up against the grip.
What the right figure is depends on the model and on the length of the bow, so go by what the manufacturer states for yours. A general number is no help here, because a bow of 62 inches (157 cm) wants different values from one of 70 inches (178 cm).
If your measurement is off, correct it through the string. Unstring the bow, add a few twists to raise the brace height or take some out to lower it, then string it again and measure once more. Two or three rounds of that is normal.
Setting nocking point and arrow rest
That leaves the two parts that guide the arrow.
The arrow rest goes into the window of the riser, the cut out above the grip. Stick on rests have a pad that presses onto a degreased surface. Screw in rests sit in the threaded hole provided. Make sure the arm of the rest sits level and the arrow lies free on it.
The nocking point marks the spot on the string where you nock your arrow, so that every arrow starts from the same height. Without one the contact point wanders from shot to shot and your groups spread vertically.
You measure from the 90 degree line, meaning the horizontal between arrow rest and string, using a bow square. How far above that the nocking point sits depends on the type of rest you run:
- Glue on or screw in arrow rest: roughly 5/16 to 3/8 inch (8 to 10 mm) above the 90 degree line.
- Shelf or traditional rest: roughly 7/16 to 1/2 inch (11 to 13 mm) above the 90 degree line.
You fix the nocking point in place with nocking pliers. Some archers wrap serving thread instead, which holds just as well.
Five common mistakes after assembly
The classic one is the wrong silhouette, which we covered above. These five come next and often only surface after a few sessions.
- Limb bolts left finger tight; A limb with play in its pocket rattles in the shot and wears the fitting. Go round them again after your first arrows.
- New string left untwisted: The strands sit loose alongside each other, the string stretches faster, and brace height drops below spec within a few sessions.
- Loops swapped: With the large loop at the bottom there is too much play in the groove. It can wander sideways and, at worst, come off.
- Brace height never rechecked: Strings stretch noticeably while you break them in. Measure once at the start only and you will soon be shooting a figure that no longer applies.
- Bow stored strung: The limbs stay under load and give up power over time. Unstring after shooting, which is what a take-down bow is built for.
A few closing thoughts
Assembly itself is no great art, the order of work carries you through. What matters is that checking look from the side before the first arrow goes on, because a bow that is put together wrong looks surprisingly right at a glance. Get yourself a stringer and a bow square along with your first build, and the second time round it will all be done in minutes.
FAQs
Which limb goes on top of a recurve bow?
If one of the limbs is marked upper or lower, follow that marking. Where no such marking exists, the two limbs are identical on many entry level models, and the limb carrying the draw weight figure conventionally goes at the bottom.
How do I tell whether the string is on the wrong way round?
Look at the bow from the side. Assembled correctly, the bow curves away from you, the string runs on the side facing you, and near the limb tips it lies against the limb for a short stretch. If the bow looks flat, or forms an even half circle with no contact at the tips, something is back to front.
Can I string a recurve bow without a stringer?
We would advise against it. Stepping through with your leg twists the bow instead of bending it evenly, which can warp the limbs permanently. If the bow slips while you do it, the string catches your forearm. A bow stringer bends both limbs in the right plane and costs little.
Which string loop goes on top?
The larger of the two loops belongs on the upper limb and the smaller one on the lower limb. The large loop needs to slide along the limb as you string the bow, while the small one sits fixed in its groove.
What brace height is right for a recurve bow?
That depends on the model and the length of the bow, which is why the manufacturer figure for your bow is the one that counts. You measure it with a bow square between the deepest point of the grip and the string, and you correct it through the number of twists in the string.
Do I have to unstring the bow after shooting?
Yes, that is the usual practice with a take-down recurve. Left strung, the limbs stay under constant load and lose power over time.