
Arrow Rest and Plunger Setup on a Recurve
What the arrow rest and plunger do
The arrow rest carries the arrow from the moment you nock it until the release, then lets it go with as little interference as possible. The plunger, also called a button, pressure button or Berger button, is a spring-loaded tip that pushes against the side of the arrow. It holds the arrow off the riser and gives a little as the arrow leaves. That matters because with a finger release the string rolls off your fingertips and the arrow flexes around the riser, an effect known as the archer's paradox.
Both parts share one goal, good clearance. The arrow should touch as little as possible on its way out. Most setups can't avoid contact entirely, because the vanes push the rest arm aside as they pass. The less there is in the way, the cleaner the arrow leaves the bow.
A plunger needs a plunger hole with a 5/16 inch thread in the riser. Almost every metal target riser has one, and many wooden bows do too, though usually just a single hole. Compound bows use different rests, usually without a plunger, so this guide sticks to the recurve.
Which arrow rest suits which bow
On a recurve you will mostly come across three designs. They differ in how they attach and in what holds the arrow sideways.
| Type | Mounting | Side support | Made for |
|---|---|---|---|
| Plastic stick-on rest | double-sided tape, hole over the plunger hole | lip on the rest arm, a plunger can be added | wooden bows and beginners, separate versions for right and left hand |
| Screw-on magnetic rest | screw in the front hole, plunger in the rear one | lip on the magnetic arm plus plunger, arm adjustable for height and reach | metal risers with two holes |
| Stick-on magnetic rest without a lip | tape with a pre-punched hole for the plunger | plunger only, no support on the outside | archers who shoot with a clicker |
Wooden risers are wider, and for stability their sight window is cut less far past center than on a target recurve. Many could in theory be shot off the rounded arrow shelf, directly off the wood. Most beginners still start with a stick-on rest, because its lip keeps the arrow in place while drawing. Without it, the arrow tends to slide sideways or drop off, especially early on.
A stick-on rest costs just a few euros and is no makeshift solution. It also fits a metal riser and makes a good starting point there. The screw-on magnetic rest with plunger takes more work to set up, but it adjusts far more finely and is usually more durable too. We still don't fit one to a wooden bow with a single hole. The plunger would have to clamp the rest in place as well, and that holds less securely than a dedicated screw.
You'll find the models in our arrow rests for recurve and longbows category. That page is about choosing one, this guide is about getting it onto the bow.
Why does a thin arrow wobble on the rest?
Stick-on rests are mostly designed around standard-diameter arrows. A shaft like that sits snugly in the cradle between the lip and the spacer, and nothing moves. Beginners, though, usually shoot around 20 lbs (9 kg) of draw weight, and that calls for a weak arrow. Spine describes how stiff a shaft is, and the higher the number, the weaker the shaft. With a light draw weight you quickly end up around 1000 to 1300, depending on draw length and arrow length.
Shafts that weak almost only come in slim diameters. At a larger diameter the carbon wall would have to be so thin that the shaft would no longer be stable. In our range, standard-diameter shafts therefore mostly stop at spines around 700 to 800, while the slim series go to 1200, 1300 and beyond. Our spine calculator works out which value fits your draw weight and draw length, here we only look at what it means for the rest.
A thin arrow on a rest whose arm doesn't roll it toward the riser by itself sits loosely. Good stick-on rests have a slightly curved arm and a spacer that holds the arrow in position. On some models the arm is straight and the spacer tiny. On a metal riser the arrow then points right, toward the riser, on a right-handed bow, and that is exactly what you don't want. A plunger fixes both problems, even on a simple bow. It presses the arrow into position and can be screwed in until the alignment is right.

Mounting a stick-on rest
The stick-on rest is the simplest option and goes on in a few minutes. Make sure you buy the right hand, they come in separate versions for right- and left-handed bows.
- Prepare the surface. Lift an old rest off with a sharp knife slid flat under the pad. Remove adhesive residue and grease with isopropyl alcohol and a clean cloth, on a new bow as well.
- Dry fit. Hold the rest against the sight window with the backing still on. Its hole must sit exactly over the plunger hole, and the rest itself must be level. If you like, mark its position with a soft pencil.
- Stick it on. Most stick-on rests come with double-sided tape already applied. Peel off the backing, line up hole over hole and press firmly. The arm with the lip points forward at an angle, toward the target.
- Give it time. The tape needs a while to bond fully. If the manufacturer states a waiting time for your model, follow it.
- Check the alignment. Nock an arrow and sight from behind over the string, as described in the section on the center shot.
Trimming the lip
This is something we do for many customers who come to us with a stick-on rest. The lip at the front of the arm is usually generous, and the arrow wouldn't fall off with a smaller one either. Cut a piece off with scissors or side cutters. Leave enough that the arrow stays put while you draw. Two small cuts are better than one cut too many.
The reason is clearance. As the arrow leaves, the vanes push the arm aside and have to get past the lip. The less of it there is, the less it disturbs the fletching, whether you shoot plastic vanes or feathers.
Mounting a magnetic rest and plunger
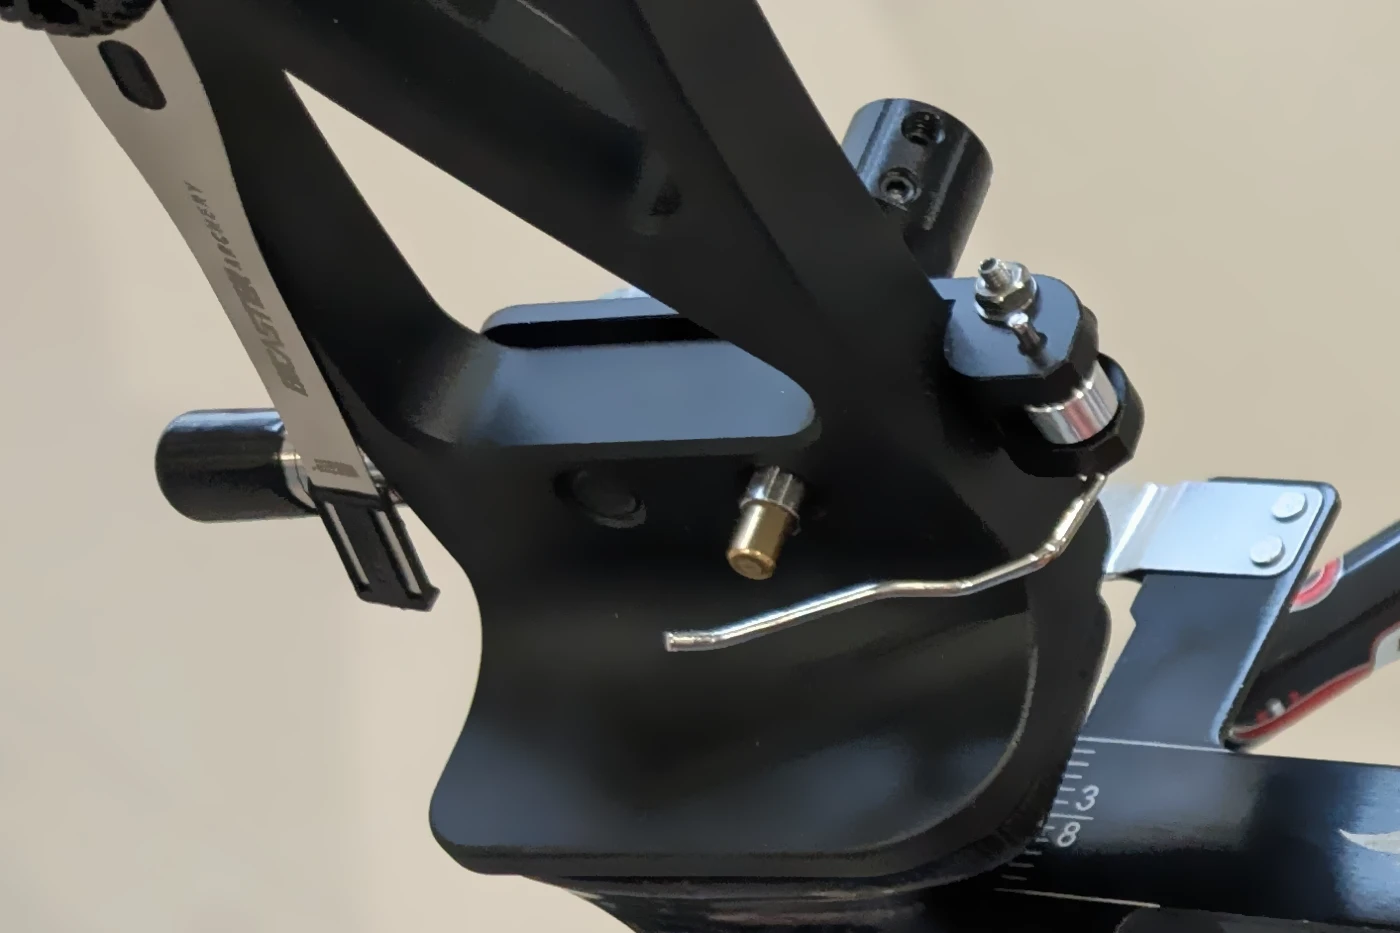
A magnetic rest combined with a plunger is the standard on target recurves. The magnetic arm folds away as the arrow passes, and the magnet pulls it back into place. Metal risers usually have two holes for this. We bolt the rest into the front one and put the plunger in the rear one.
Pre-bending the rest arm
Straight out of the pack, the arm of a magnetic rest is usually straight. Depending on the rest and the width of the riser, it may not fold in once mounted, because the rear edge of the sight window gets in the way. In that case, bend it slightly with pliers. The arm is spring steel or stainless steel and can take this, but only once and only in one direction. It won't survive being bent back and forth. Some rests come pre-bent or stick on from the inside, and then you can skip this step.
Bolting on the rest and fitting the plunger
- Position the rest. Pass the screw through the rest into the front hole. Many sets include matching screws and hex keys, and the threads on risers are standardized.
- Choose the gap. You can push the rest right up against the riser or leave a little gap. Pushed all the way in it feels more solid, with a small gap the arm folds more easily and needs less bending. Both work, the forces on the rest are small.
- Tighten it level. As you tighten the screw, the rest tends to rotate upward with it. Hold it with your free hand so it stays level. If it sits crooked, the plunger won't fit through its slot, and you'll notice in the next step at the latest.
- Screw in the plunger. Turn the plunger through the slot in the rest into the rear hole until its tip reaches into the sight window and touches the arrow. Exactly how far, you set during the center shot.
Setting the center shot
Center shot describes the sideways position of the arrow, in other words whether it goes straight through the bow. You check it from behind. Hold the strung bow upright, nock an arrow and sight over the string so that it runs down the middle of the riser and limbs. That is your reference line.
The goal is an arrow pointing straight ahead. On a right-handed bow the point may peek out just left of the string instead of disappearing behind it completely. Many Olympic-style archers prefer exactly that, and both dead center and a touch to the left are fine. If the point aims right, toward the riser, the setting is off. On a left-handed bow everything is mirrored.
You adjust it with the plunger. It sits in the thread with a lock ring, which on many models is secured with a small hex screw. Loosen the ring, then on a right-handed bow:
- Point aims right: Screw the plunger in further. Its tip reaches further into the window and pushes the arrow outward.
- Point aims clearly left: Back the plunger out a little, and the arrow moves closer to the riser.
Once the alignment is right, tighten the ring again. Hand tight is enough. A drop of thread locker is optional and rarely needed. The plunger also has a spring tension adjustment, so take care not to turn it by accident while tightening. What it does is covered further down.
Setting the height of the rest arm
If the center shot is right and the arrow still sits loosely, the height of the rest arm is the next thing to look at. The lip and the plunger together form a small cradle. A thick arrow fits it well, a thin one often rattles around in it. Important: You always set the height on the rest, never on the plunger. The plunger only adjusts sideways.
On the joint of the magnetic rest there is a small hex screw on the side. Loosen it and you can slide the arm up and down as well as in and out. Use the arrow you actually shoot and check two things:
- Is the arrow right in front of the plunger? The plunger tip should touch the shaft halfway up, not at its top or bottom edge.
- Do lip, arrow and plunger form one solid unit? Slide the arm in far enough that the arrow no longer wobbles between lip and plunger.
The two are connected. On many magnetic rests the arm rises slightly toward its tip, so sliding it further in lifts the arrow a little. The plunger tip then meets the lower half of the shaft instead of the middle. In practice, lowering the arm by about 1/32 inch (1 mm) afterwards is often enough. Tighten the screw again and check that the arm folds freely and doesn't catch under the plunger.
Changing the rest height also shifts the reference line for the nocking point. With stick-on and screw-on rests it sits about 5/16 to 3/8 inch (8 to 10 mm) above square. How to measure and set it with a bow square is covered in our guide to assembling a recurve bow. That guide covers the whole bow, this one the parts that guide the arrow.
How stiff should the plunger be?
The spring inside the plunger decides how much it gives as the arrow leaves. That give makes tuning easier and improves clearance, which is why a bow shot off the shelf is harder to tune than one with a rest and plunger.
Start with the plunger set to medium. On many models you turn an adjustment screw that clicks audibly. As a rule, screwed all the way in it is very stiff and backed far out it is very soft. Sets often include extra springs of different stiffness, but you only need those for fine tuning.
The lower limit when you shoot with a clicker
If you shoot with a clicker, there is a clear lower limit. The clicker is a thin spring blade that presses the arrow lightly toward the riser and so against the plunger. If the plunger spring is weaker than that pressure, the clicker pushes the tip in a little. The moment the clicker clicks, the pressure is gone, the plunger springs back and nudges the arrow away from the sight window, right as you release. So set the plunger at least stiff enough that the clicker cannot push the tip in.
Fine tuning from your groups
Plunger tension can make up for small spine deviations, not large ones. No plunger turns a badly mismatched arrow into a good one. For a right-handed archer, an arrow that is too stiff hits left and one that is too weak hits right. Too stiff means softening the spring and bringing the arrow slightly closer to the riser, too weak means stiffening the spring and moving the arrow slightly further out. Change one thing at a time and shoot enough arrows in between to see a trend.
Olympic-style archers go on to detailed walk-back tests, shooting at the same vertical line from several distances. That is a topic of its own. One observation is worth making without any test, though. A stiffer plunger is less forgiving of your release, and mistakes show up more clearly in your groups. How stiff you can go and still shoot clean groups says something about your release technique.
Which way should the cock vane point?
Most arrows have two vanes in one color and one in another. The odd one out is the cock vane, also called the index vane. It is glued on just like the others but tells you which way round the arrow goes on the bow.
By the book, the cock vane points straight out, away from the bow, so to the left on a right-handed bow. The other two vanes then pass the plunger without hitting it. With good tuning, that works. For many archers who are just starting out with a magnetic rest and plunger, it works less well. The lower of the other two vanes is meant to push the rest arm aside and ends up in the notch formed by plunger and arm. It catches there, gets wavy or eventually comes off the shaft.
We regularly see archers in our shop with exactly this problem. Our advice is to rotate the nock in the shaft so the cock vane points down at an angle, at roughly 6:30 from the archer's view on a right-handed bow. The cock vane then meets the arm at an angle, pushes it aside less and no longer gets caught between plunger and arm. The vane on the plunger side sits at about 2:30 and clears the plunger just above it. As a rule, that improves clearance. On a left-handed bow everything is mirrored, with the cock vane at about 5:30.
Maintenance and five mistakes we see often
The plunger is a wear part. Its tip rubs against the arrow on every shot, and dirt and rain take their toll on spring and housing. After a wet or dusty day, take it apart and clean the parts in alcohol, or more thoroughly in an ultrasonic cleaner. Note down your settings first, otherwise you'll be hunting for the center shot all over again. A new plunger costs roughly 8 to 50 euros depending on features, with shipping and import duties varying by country, and you'll find the range under buttons and clickers.
Whenever you change the rest or plunger, re-sight your bow. Start at a short distance and work your way back. After training, take a look at the rest arm and vanes as well. Light, even marks are normal, wear on one side points to sideways contact.
- The arrow point aims toward the riser. On a right-handed bow, that means to the right. The plunger doesn't reach far enough into the window and needs to go in further.
- The rest arm was bent back and forth. Spring steel takes one bend in one direction, not bending back. If it has happened, better replace the arm.
- The rest twisted while being tightened. It sits crooked, the plunger doesn't pass cleanly through its slot, and the arrow doesn't lie straight.
- The lock ring is loose. The plunger creeps in its thread, the center shot changes from day to day and your sight setting won't hold. If you keep having to correct, check ring, tip and spring first.
- The stick-on rest went onto an uncleaned surface. Without degreasing, the tape won't hold for long and the rest shifts without you noticing.
Wrapping up
Mount the rest first, then set the center shot from behind and position the arm so the plunger tip meets the arrow halfway up. Start the plunger at medium tension and change only one thing at a time from there. Then shoot a few arrows at short range and look at your vanes and rest arm. If the marks are light and even and no vane is wavy, your arrow is clearing cleanly and fine tuning can begin.
Frequently asked questions
How do I set up the plunger on a recurve bow?
Sideways first, by how far you screw it in. Turn the plunger into the window until the arrow points straight ahead when seen from behind, on a right-handed bow the point may peek out just left of the string. Then tighten the lock ring hand tight and set the spring to medium tension. Everything else you tune based on arrow flight.
Where does the arrow rest go on the bow?
In the sight window, level with the plunger hole. A stick-on rest sits with its hole exactly over that hole, level and with the arm pointing forward at an angle. On metal risers with two holes, a magnetic rest is bolted into the front one and the plunger goes into the rear one.
How high should the arrow rest sit?
High enough that the plunger tip touches the arrow halfway up the shaft. You set this on the rest arm, the plunger only adjusts sideways. If sliding the arm further in lifts the arrow, lowering it by about 1/32 inch (1 mm) often helps. Then check the nocking point, which sits about 5/16 to 3/8 inch (8 to 10 mm) above square with a rest.
Do beginners need a plunger?
Not necessarily. A stick-on rest with a lip holds the arrow on its own. A plunger becomes useful when a thin arrow wobbles on the rest or the point aims right, toward the riser, on a right-handed bow. Weak beginner arrows with spines around 1000 to 1300 are usually slim, so this happens on entry-level bows more often than many expect.
Why are my vanes getting wavy or coming off?
Usually a vane is getting caught in the notch between plunger and rest arm. This happens mostly when the cock vane points straight out from the bow, as the textbook says. Rotate the nock so the cock vane points down at an angle, at roughly 6:30 on a right-handed bow. With stick-on rests, trimming the lip helps as well.
How stiff should the plunger spring be?
Medium to start with. If you shoot with a clicker, it has to be at least stiff enough that the clicker cannot push the plunger tip in, otherwise the plunger nudges the arrow away from the sight window the moment the clicker clicks. Fine tuning is done from your groups, for a right-handed archer a stiff arrow hits left and a weak one hits right.